
 This is one of the first patterns I created in the Amigurumi Style. Please let me know if there are any errors! Thanks
Materials:
E hook
pink worsted yarn
9mm safety eyes
tapestry needle for sewing
Abbreviations:
Magic Circle (follow link to tutorial if new to amigurumi)
invdec - invisible decrease (follow link to tutorial)
sc - single crochet
inc - increase (2 sc in each st)
st - stitch
FO - Finish Object (usually decreasing or pulling together the last few stitches to close hole)
sl st - slip stitch
_______________________________________________________________
Directions
_________________________________________________________
Body
inc around (16)
1 sc, inc, repeat around (24)
2 sc, inc, repeat around (32)
3 sc, inc, repeat around (40)
4 sc, inc, repeat around (48)
10 rows sc around
3 sc, invdec, repeat around------------Put in eyes
stuff firmly but not stretching the stitches
2 sc, invdec, repeat around
1 sc, invdec, repeat around
FO
Ears
magic circle 4
inc around
1 sc, inc, repeat around
2 sc, inc, repeat around
3 sc, inc, repeat around
FO
Leave long tail for sewing(fold in half & shape to sew on)
Tail
Chain 11
Turn
Sc the row
FO
Leave long tail for sewing(tail curls on own but may need shaping)
Snout
magic circle 8
inc around
2 rows sc around
stuff lightly
FO
Leave long tail for sewing
Feet (optional, make 4)
magic circle 8
inc around
2 rows sc around
stuff lightly
FO
Leave long tail for sewing
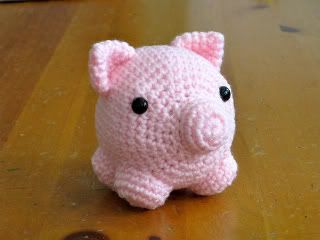
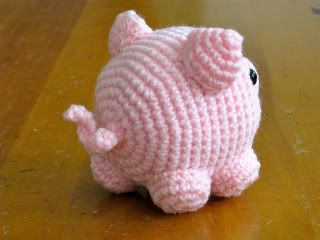
Assemble body using picture as a reference.
I added magnets to the top of the body on the inside and on the sides so this piggie could be magnetic for a friends office.
***This is a pic of the pig with feet done by Lori

I just came across this and made
ReplyDeleteIt because my 3 year old daughter loves pigs. Great patten. Thank you!